Exercise: Web Service Composition 1
Basic of Web Service Composition using WS-BPEL
WS-BPEL(Web Service Business Process Execution Language), standarlized by OASIS, is a language that define the inteaction of business process by multiple Web servicces.WS-BPEL can realize business process for Web service composition, based on Web service standards like SOAP and WSDL.
Process described by WS-BPEL(BPEL process) is defined as collection of Web services based on some decided sequences. The Web services used in the BPEL process is handled as a black box. BPEL process itself can be opened as Web service.
The purpose of this exercise is to learn and practice how to describe BPEL process for Web service composition by using WS-BPEL design tools (e.g., Eclipse BPEL Designer). In this exercise, you are required to realize the composite back translation service (translate the source from language A to language B and then traslate the result from language B back to language A) by connecting two atomic machine translation services provided by the Language Grid. The back translation is always used for evaluation of the machine translation quality.
Activity and Structure of BPEL Process
BPEL process is described in XML. We will show the XML structure example of back translation example as follows.
| XML structure of BPEL process |
|---|
<?xml version="1.0" encoding="UTF-8"?>
<bpws:process name="Backtrans"
    targetNamespace="http://www.ai.soc.i.kyoto-u.ac.jp/process/Backtrans/"
    exitOnStandardFault="yes"
    suppressJoinFailure="yes"
    xmlns:bpws="http://docs.oasis-open.org/wsbpel/2.0/process/executable"
    xmlns:ns="http://www.ai.soc.i.kyoto-u.ac.jp/process/Backtrans/Artifacts"
    xmlns:ns0="http://langrid.ai.soc.i.kyoto-u.ac.jp/langrid-service_1_2/services/JServer"
    xmlns:tns="http://www.ai.soc.i.kyoto-u.ac.jp/process/Backtrans/">

    <!?import definition-->
    <bpws:import importType="http://schemas.xmlsoap.org/wsdl/"
        location="../wsdl/Backtrans.wsdl"
        namespace="http://www.ai.soc.i.kyoto-u.ac.jp/process/Backtrans"/>
    <bpws:import importType="http://schemas.xmlsoap.org/wsdl/"
        location="..."
        namespace="..."/>

    <!?partner link definition-->
    <bpws:partnerLinks>
        <bpws:partnerLink name="TranslateAltPL"
            partnerLinkType="ns:TranslatePLT"
            partnerRole="translator"/>
        <bpws:partnerLink name="..."
            partnerLinkType="..."
            partnerRole="..."/>
    </bpws:partnerLinks>

    <!?variable definition-->
    <bpws:variables>
        <bpws:variable messageType="tns:translateRequest"
            name="backtransRequest"/>
        <bpws:variable messageType="..."
            name="..."/>
    </bpws:variables>

    <!--activity definition in the sequence structure-->
    <bpws:sequence>
        <bpws:receive.../>
        <bpws:assign...>...</bpws:assign>
        <bpws:invoke...>...</bpws:invoke>
        <bpws:assign...>...</bpws:assign>
        <bpws:reply.../>
    </bpws:sequence>
</bpws:process>
|
Tasks in BPEL process is described as activities. Different types of activities have different functions. Here we explain some activities that will be used in this exercise.
- Receive:get request message from the client
- Reply:send the response message to the client
- Invoke:call Web service
- Assign:Data transfer(Copy variables)
| XML structure of Reveive activity |
|---|
        <bpws:receive createInstance="yes" name="Receive"
            operation="translate" partnerLink="BacktransPL"
            portType="tns:Backtrans" variable="backtransRequest"/>
|
| XML structure of Reply activity |
|---|
        <bpws:reply name="Reply" operation="translate"
            partnerLink="BacktransPL" portType="tns:Backtrans"
            variable="backtransResponse"/>
|
| XML structure of Invoke activity |
|---|
        <bpws:invoke inputVariable="translateRequest1"
            name="ForwardTranslation" operation="translate"
            outputVariable="translateResponse1"
            partnerLink="TranslatePL" portType="ns0:Translation">
            <bpws:catch faultName="ns0:UnsupportedLanguagePairException">
                <bpws:sequence>
                    <bpws:invoke inputVariable="translateRequest1"
                        name="ForwardTranslationAlternative"
                        operation="translate"
                        outputVariable="translateResponse1"
                        partnerLink="TranslateAltPL" portType="ns0:Translation"/>
                </bpws:sequence>
            </bpws:catch>
        </bpws:invoke>
|
| XML structure of Assign activity |
|---|
        <bpws:assign name="Assign" validate="no">
            <bpws:copy>
                <bpws:from part="sourceLang" variable="backtransRequest"/>
                <bpws:to part="sourceLang" variable="translateRequest1"/>
            </bpws:copy>
            <bpws:copy>
                <bpws:from part="intermediateLang" variable="backtransRequest"/>
                <bpws:to part="targetLang" variable="translateRequest1"/>
            </bpws:copy>
            <bpws:copy>
                <bpws:from part="source" variable="backtransRequest"/>
                <bpws:to part="source" variable="translateRequest1"/>
            </bpws:copy>
        </bpws:assign>
|
Steps for creating BPEL Process
Creation of BPEL process include following steps: process definition, process deployment, and test.
- Process Definition: In this step, BPEL process is described. The invoke of Web services and the execution sequences are desribed. BPEL process is described in XML, however, it can be visualized by using GUI editor for BPEL process(e.g., Eclipse BPEL Designer(open source), ActiveVOS Designer (business license) and so on).
- Process Deployment: In this step, BPEL process is deployed in BPEL execution engine so as to be opened as executable service. The steps of BPEL process deployment are different for different execution engines.
- Test: In this step, the deployed BPEL service is tested for execution.
Practice of BPEL Process Creation
Environment Example
In this exercise, we will create BPEL process using the following environment.
- Process Definition To describe BPEL process for Web service composition, we use visualized BPEL editor. In this exercise, the opensource software Eclipse BPEL Designer will be used.
- Process Deployment We use the opensource software ActiveBPEL Community Edition BPEL Engine as the BPEL execution engine.
- Test To test deployed services, we will use the Web service testing client software soapUI.(Refer to Exercise: Basic of Web Service 1.)
http://www.eclipse.org/bpel/
Eclipse BPEL Designer is opened as the Eclipse plugin. Therefore, it is required to download Eclipse3.4 (Ganymede) and install it.
http://www.eclipse.org/ganymede/
Eclipse BPEL Designer does not properly work on Eclipse 3.5.
After installing Eclipse 3.4, refer to the following page to continue to install the BPEL Designer plugin.
http://download.eclipse.org/technology/bpel/update-site/
To use ActiveBPEL Community Edition BPEL Engine, JDK5.0 is required. Download it from the following page and install it.
http://java.sun.com/j2se/1.5.0/ja/download.html
NOTE: The version of JDK must be 5.0. ActiveBPEL Community Edition BPEL Engine does not correctly work with JDK 6.
After installing the JDK, it is required to set the environment variables as follows.
-Name of the environment variable:JAVA_HOME
-Value:the path of JDK home directory
ActiveBPEL Engine 5.0 runs on Apache Tomcat. Download Tomcat from the following page. (Select version 5.5.x to download)
http://tomcat.apache.org/download-55.cgi
(For Windows Vista Users: We strongly recommend that you should install Tomcat at a location other than Program Files folder. The User Account Control of Windows Vista may prevent the software from correcly working.)
After installing Tomcat, it is required to set the environment variable as follows.
-Name of the environment variable:CATALINA_HOME
-Value:the path of Tomcat home directory
Download the ActiveBPEL Community Edition BPEL Engine(version 5.0)from the following link.
activebpel-5.0.2-bin.zip
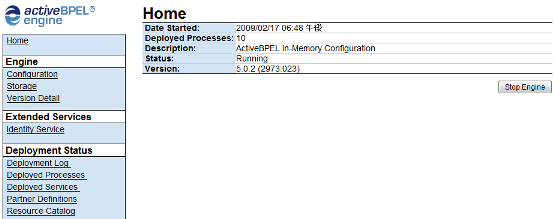
As for the installation method of ActiveBPEL Engine, refer to "doc\install_engine.txt" after extracting the downloaded file. If the installation is correct, access the following URL when Tomcat is running, and the administration page of ActiveBPEL Engine can be displayed.
http://localhost:8080/BpelAdmin/
The BPEL Process in this Exercise
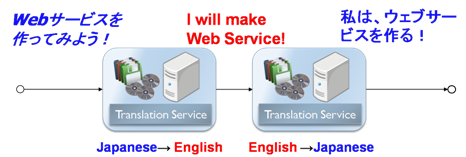
In this exercise, you are required to realize the composite back translation service (translate the source from language A to language B and then traslate the result from language B back to language A) by connecting two atomic machine translation services provided by the Language Grid.
The machine translation service used in this exercise is J-Server (Kodensha) provided by the Language Grid.
The back translation service is realized by composing two machine translation services. (Translation service 1: Japanese→English + Translation service 2: English→Japanese)
The specification of the back translation BPEL process is as follows.
- Translation Service
- Input: {source language,target language,source}
- Output:{translation result}
- BPEL Process
- Input: {source language,intermediate language,source}
- Output:{translation result}
- Dataflow The dataflow in this BPEL process is shown as follows.

Steps for Creating Back Translation BPLE Process
Steps for creating back translation BPLE process using Eclipse BPEL Designer is as follows.
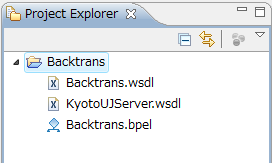
- 1. Create Project
- Start Eclipse, select File->New->Project from the menu and select BPEL 2.0->BPEL Project. Set the items as follows.
- Project Name: Backtrans
- Select "BPEL 2.0 Facet"
- 2. Create BPEL file
- Right click the created Backtrans project, and select New->Other, BPEL2.0->New BPEL Process File. Set the items as follows.
- BPEL Process Name: Backtrans
- Namespace: http://www.ai.soc.i.kyoto-u.ac.jp/process/Backtrans/
- Template: Empty BPEL Process
- 3. Prepare WSDL
- Download WSDL for J-Server (KyotoUJServer.wsdl) and WSDL for the back translation BPEL process (Backtrans.wsdl), and import them into the project directory. (In web browser, the default file names of the downloaded WSDL might be "KyotoUJServer.xml", "Backtrans.xml". Please change them into "KyotoUJServer.wsdl", "Backtrans.wsdl".)
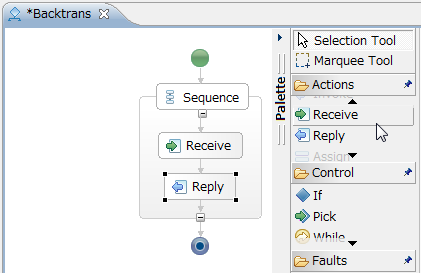
- 4. Add Receive and Reply
- Click the Palette bar on the right side of the BPEL process editor window, the list of activities will be shown. Drag "Receive" and "Reply" into the "Sequence" structure.
- Set "Receive"
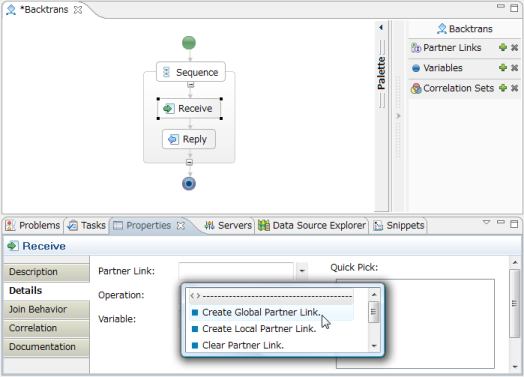
- Right click "Receive", select "Show in Properties", and click the "Details" tag.
- In "Partner Link", select "Create Global Partner Link".
- Set the name of Partner Link as BacktransPL.
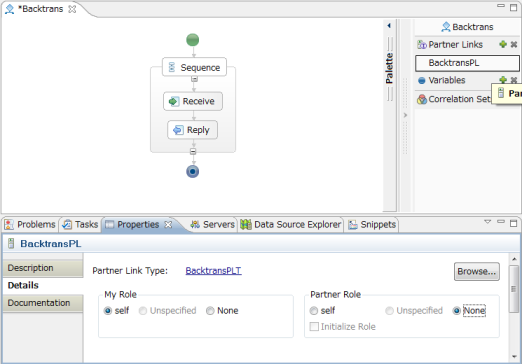
- In the "Choose Partner Link Type" dialogue, select Backtrans from the column of Matches, and click OK. If the Backtrans is not shown, select the radiobutton of "Show Partner Link Types" column, and select "From Project" to confirm.
- Set the items in the following two dialogue as shown below.
- Partner Link Type Name: BacktransPLT
- Role Name: self
- Port Type: Backtrans
- Select BackTransPL from PartnerLinks on the right top of the window, set "My Role" as "self".
- Save the BPEL process in this phase. Select File->Save from the menu, or use Ctrl+S to save.
- In "Properties" of "Receive", set "operation" as "translate".
- Then, the input variables will be created. Click "+" in the "Variables" tag on the right side, and change the created variable name as backtransRequest in the "Description" tag on the buttom part of the window.
- When the backtransRequest is selected, click "Data TypeからBrowse..." in the "Details" tag within the "Properties" tag and select "translateRequest"(Please confirm that "From Project" is selected in "Show XSD Types". Also confirm that "Messages" is checked in "Filter". Moreover, "Show Dupilicates" should also be checked. Select the one that has "intermediateLang").If the "Details" tag is not shown, right click "backtransRequest" and select "Show in properties".
- Finally,set Properties->Details of Receive as follows.
- Set "Operation" as "translate"
- Set "Variable" as "backtransRequest"
- Check "Create a new process instance if one does not already exist"
- Set "Reply"
- The input variables will be created. Click "+" in the "Variables" tag on the right side, and change the created variable name as backtransResponse in the "Description" tag on the buttom part of the window.
- In "Data Type" of "Details", select "translateResponse" by "Browse...". Select the message with "result" as a part.(Please confirm that "Messages" is checked in "Filter".)
- Set Properties->Details of Reply as follows.
- Partner Link: BacktransPL
- Operation: translate
- Variable: backtransResponse(if only backtransRequest is shown, please type backtransResponse directly)
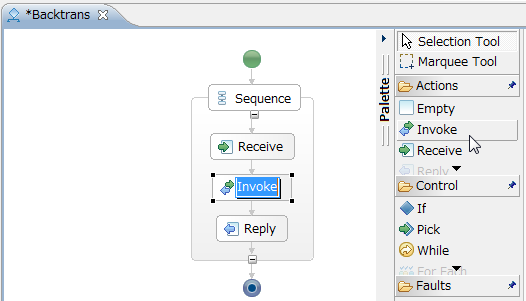
- 5. Add "Invoke"
- Drag "Invole" from "Palette", and place it between Receive and Reply.
- Set "Invoke"
- Set Name as ForwardTranslation by selecting "Properties" tag->"Description" tag.
- Select "Create Global Partner Link" in "Partner Link" by selecting "Properties" tag->"Description" tag,and set Partner Link Name as TranslatePL.
- In "Choose Partner Link" dialogue, select Translation from the column of Matches, and click OK. If the Translation is not shown, select the radiobutton of "Show Partner Links" column, and select "From Project" to confirm.
- Set the items in the following two dialogue as shown below.
- Partner Link Type Name: TranslatePLT
- Role Name: translator
- Port Type: Translation
- Select BackTransPL from PartnerLinks on the right top of the window, set "Partner Role" as "translator".
- Then, the input variables will be created. Click "+" in the "Variables" tag on the right side, and change the created variable name as translateRequest1 in the "Description" tag on the buttom part of the window.
- In "Data Type" of "Details", select "translateRequest" by "Browse...". (Please confirm that "From Project" is selected in "Show XSD Types". Also confirm that "Messages" is checked in "Filter". Moreover, "Show Dupilicates" should also be checked. Select the one that has "targetLang" )
- Create the output variable by the same method. Set the name as translateResponse1 and set Data Type as translateResponse.(Wehn setting Data Type, confirm that "Messages" is checked in "Filter". Moreover, "Show Dupilicates" should also be checked. Select the one that has "translateReturn".)
- Select ForwardTranslation, set items from Properties->Details as follows.
- Operation: translate
- Input Variable: translateRequest1
- Output Variable: translateResponse1
- Right click ForwardTranslation and select Duplicate, set the name as BackwardTranslation from Property->Descriptions.
- Line the sequence of the two invoke activities as ForwardTranslation -> BackwardTranslation.
- Same as ForwardTranslation, create and set two variables "translateRequest2" and "translateResponse2". Also set the "Data Type" the same as that of ForwardTranslation.
- 6. Add "Assign"
- Drag "Assign" from "Palette", and place after the Receive activity.
- Set the "Assign" activity. Create the following three copy operations by add "New" in "Properties"->"Details"
- backtransRequest/sourceLang -> translateRequest1/sourceLang
- backtransRequest/intermediateLang -> translateRequest1/targetLang
- backtransRequest/source -> translateRequest1/source
- Same as above, create the second Assign activity between ForwardTranslation and BackwardTranslation.
- Set the copy operations of the Assign activity as follows.
- backtransRequest/intermediateLang -> translateRequest2/sourceLang
- backtransRequest/sourceLang -> translateRequest2/targetLang
- translateResponse1/translateReturn -> translateRequest2/source
- Create the third Assign activity after BackwardTranslation.
- translationResponse2/translateReturn -> backtransResponse/result
- 7. Deploy Process
- To execute the BPEL process in the ActiveBPEL engine, it is require to deploy BPEL process. Therefore, two files for describing the deployment information are required (Backtrans.pdd and catalog.xml).
- Download "Backtrans.pdd" from here. In the tags of "abp:User" and "abp:CleartextPassword" (the part of "******"), set the temporary ID and password (or the Language Grid user ID and password). For the details of how to describe the pdd file, please refer to the ActiveBPEL documents.
- Download "catalog.xml" from here.
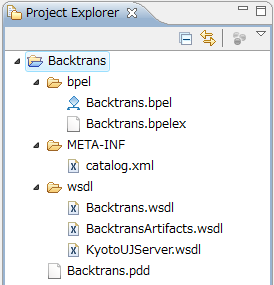
- Rearrange the directory of the BPEL project as follows. Create three folders as bpel, wsdl and META-INF, and move the files.
- Backtrans
- bpel : Backtrans.bpel, Backtrans.bpelex
- wsdl : Backtrans.wsdl, BacktransArtifacts.wsdl, KyotoUJServer.wsdl
- META-INF : catalog.xml
- Backtrans.pdd
- With rearranging the directory, bpel file is required to be modified. Open the bpel file by text editor, and modify the "location" property of "import" tag(three places) from "Backtrans.wsdl" to "../wsdl/Backtrans.wsdl".
- Open the command prompt, move the current directory to the BPEL project directory, and execute the following commands. If there are errors, confirm whether the environment variables JAVA_HOME and CATALINA_HOME are correctly set.
- "%JAVA_HOME%\bin\jar" cf Backtrans.bpr wsdl bpel META-INF Backtrans.pdd
- copy Backtrans.bpr "%CATALINA_HOME%\bpr"
- After executing above commands, it might take at most one minite to deploy the BPEL process in the execution engine.
- 8. Test
- Start the installed Tomcat.
- In the installed directory of Tomcat, start Tomcat by executing "bin/startup.bat", or starting "tomcat5w.exe" and selecting "Start" from the "General" tag.
- Tomcat can be stopped by executing "bin/shutdown.bat", or starting "tomcat5w.exe" and selecting "Stop" from the "General" tag.
- When proxy is required for connecting the network, modify "bin/catalina.bat" (or "catalina.sh") by adding "-Dhttp.proxyHost=YourProxy -Dhttp.proxyPort=YourProxyPort -Dhttp.nonProxyHosts=localhost" behind "set JAVA_OPTS= …", or starting "tomcat5w.exe" and set "Java Options" from the "Java" tag by the same method.
- When Tomcat is running, access http://localhost:8080/BpelAdmin and the ActiveBPEL engine administration page will be shown.
- Select "Deployed Service" from the left menu, click Backtrans, and the WSDL will be shown.
- Use soapUI to test the service by the same method in the former exercises.
- In soapUI, there might be multiple Bindings, select BacktransBinding.
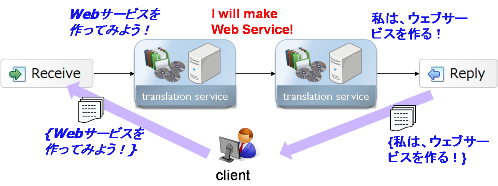
As shown in the following figure, in the back translation BPEL process the Receive activity (receive message from client) and the Reply activity (reply message to client) are required.
To add the Receive activity and the Reply activity, please follow the steps below.


As shown in the following figure, in the back translation BPEL process, it is required to add the invoke activity twice for calling external translation service J-Server twice.

Add "Invoke" by following the steps shown below.

To transfer the execution result of one Web service to the other, it is required to difine the Assign activity for operating the variables.

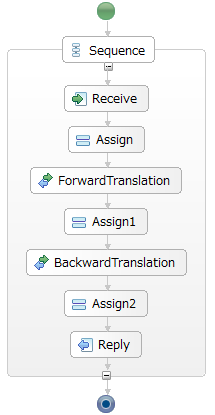
In the back translation BPEL process, the following three Assign activities are required. The following figure shows all the dataflow of the three Assign activities.

Add "Assign" by following the steps below.

The following figure shows the screenshot after the whole back translation BPEL process is created.
| The modification result of the "import" tag |
|---|
<bpws:import importType="http://schemas.xmlsoap.org/wsdl/" namespace="http://www.ai.soc.i.kyoto-u.ac.jp/process/Backtrans/Artifacts"/> <bpws:import importType="http://schemas.xmlsoap.org/wsdl/" location="../wsdl/Backtrans.wsdl" namespace="http://www.ai.soc.i.kyoto-u.ac.jp/process/Backtrans/"/> <bpws:import importType="http://schemas.xmlsoap.org/wsdl/" location="../wsdl/BacktransArtifacts.wsdl" namespace="http://www.ai.soc.i.kyoto-u.ac.jp/process/Backtrans/Artifacts"/> <bpws:import importType="http://schemas.xmlsoap.org/wsdl/" location="../wsdl/KyotoUJServer.wsdl" namespace="http://langrid.ai.soc.i.kyoto-u.ac.jp/langrid-service_1_2/ services/JServer"/> |
Try More Language Services
You can practice this exercise more by creating back transtion service using more than two intermediate languages at the same time. To achieve this extended exercise, you can use the following language service provided by participants of the Language Grid together with J-Server.
- Google Translate
- Copyright: Google, Inc.
- Supported languages: Refer to Service Profile
- Operation: String translate (String sourceLang, String targetLang, String source)
- sourceLang: Source language
- targetLang: Target language
- source: Sentence to be translated